Silver ring making beats souvenir shopping. In Canterbury, I like this workshop because you get hands-on instruction with Annie in a real studio setting, not a demo-and-watch class. I also love that you learn the full process—sawing, annealing, forging, soldering, and finishing—so your ring is truly yours, not just stamped with your name. One heads-up: the silver materials cost is extra on top of the $131.95 price.
Expect about 2–3 hours of focused making, starting around 10am at 76 Castle St. The big value here is that you’re guided through each stage with patience, and you can keep your design simple (beginners and no signet rings). The only real drawback to consider is that your final cost depends on the ring weight, since materials aren’t included.
In This Review
- Key things to know before you go
- Canterbury’s silver ring workshop: what you’re really buying
- Getting set up at 76 Castle St (and why the timing matters)
- Choosing your beginner-friendly ring design (and why simple is good here)
- Sawing silver to length: the first real step of making
- Pattern, texture, and stamping: making your ring feel personal
- Annealing with a torch: why this stage exists
- Forging, shaping, and sizing: turning flat metal into a band
- Soldering the join: torch work without the fear
- Filing, buffing scratches, and polishing: the part that sells the magic
- Coffee, tea, and studio vibe: small comforts that help you learn
- Price and value: $131.95 plus the real silver-materials add-on
- Who should book this ring workshop in Canterbury?
- Should you book Silver Ring Workshop in Canterbury?
- FAQ
- How long is the silver ring workshop?
- What is included in the price?
- Are the silver materials included?
- What happens when I arrive?
- Can beginners participate?
- What’s the workshop language?
- Where is the meeting point?
- Is it private?
- When does it run?
Key things to know before you go
- You make the whole ring, step by step, using real tools (not a craft-kit shortcut)
- Annie’s teaching style is hands-on and patient, with time to ask questions
- Full skill set for beginners: patterning or texture, annealing, forging, soldering, filing, buffing, polishing
- Materials are extra: budget about £10–£30 per ring at the end
- Private format for you and your group, with sessions that typically run 2–3 hours
- Coffee and/or tea plus an apron are included to make it feel like a proper studio morning
Canterbury’s silver ring workshop: what you’re really buying
This isn’t a quick tourist activity where you leave with a generic trinket. You’re paying for a short, guided craft session that teaches you how metal work actually happens. And for most people, that difference matters.
The experience is built around a beginner-friendly pace. You’ll start with simple design ideas, measure your finger, and then move through the classic steps—sawing silver to length, adding texture or pattern, annealing (so the metal can be shaped without cracking), forging into a band, soldering the join, and finishing it until it’s shiny and wearable.
I like that the workshop gives you a tangible story to take home. You’ll be able to explain what you did: where you added texture, how annealing helped, and what filing and buffing do to clean up seams and scratches.
You can also read our reviews of more tours and experiences in Canterbury.


Getting set up at 76 Castle St (and why the timing matters)
You’ll meet at 76 Castle St, Canterbury (CT1 2QD). It’s near public transportation, and the studio is easy to find in the city center. One practical detail: sessions run at 10:00 AM on the workshop’s active days, with Thursday–Saturday hours listed as 10:00 AM–1:00 PM—so plan for a morning block that fits the full class flow.
When you arrive, you’re not rushed into tools. You’ll join the studio at 10am, discuss basic design options, and get your finger measured. Then you get an apron and a drink (coffee and/or tea). That small setup time is actually part of the value: it slows the pace down so you can absorb what the silversmith is showing you.
Also useful: this is described as a private workshop/activity, so it’s just your group. Sessions for one or two people typically run between 2–3 hours, which feels like the right length for learning multiple steps without feeling like you’re constantly switching gears.
Choosing your beginner-friendly ring design (and why simple is good here)
You’ll talk through design basics at the start. The workshop keeps things beginner-friendly, so ring designs stay simple—no signet rings. That’s not a limitation for most people. It’s a smart way to keep the process smooth inside a short session.
Here’s what that means for you in practice:
- You’ll be guided toward designs you can realistically complete and finish during the workshop time.
- You’ll have the chance to personalize your ring through techniques like patterning, texturising, and/or stamping.
- You’ll get help making sure the band fits, since the finger measuring happens up front.
If you’re picturing a very complex, many-feature design, this might not be your best match. But if you want something wearable with a clear handmade story, it’s a strong fit.
And yes, the workshop experience is comfortable for different working styles. One review specifically noted it didn’t cause trouble for someone who’s left-handed—so you shouldn’t assume you’ll be “stuck” in a one-handed, one-tool orientation.
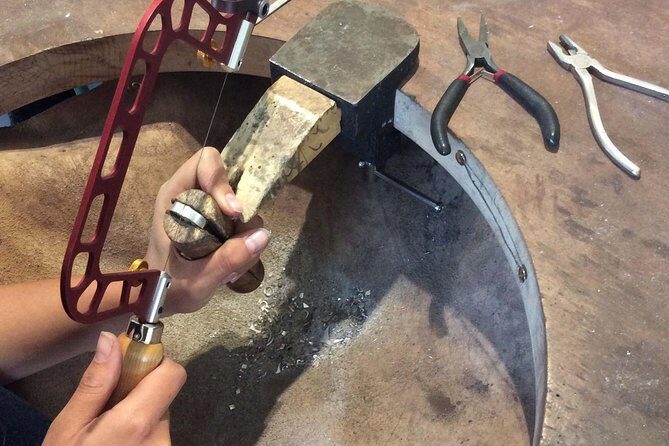
Sawing silver to length: the first real step of making
Once you’re at the workbench, the class starts with the foundation: sawing your silver to length.
This is where the experience stops being abstract. You’ll see how measurements translate to a band you can actually wear. You’ll also understand why each stage matters, because you can’t skip ahead when metal work depends on fit, thickness, and the ability to shape the metal.
Even if you’ve never held a jewelry tool before, this is taught in a way that builds confidence. The silversmith explains and demonstrates, then you replicate the technique. That teaching pattern matters because it keeps you from guessing, and it keeps you from getting stuck mid-process.
Pattern, texture, and stamping: making your ring feel personal
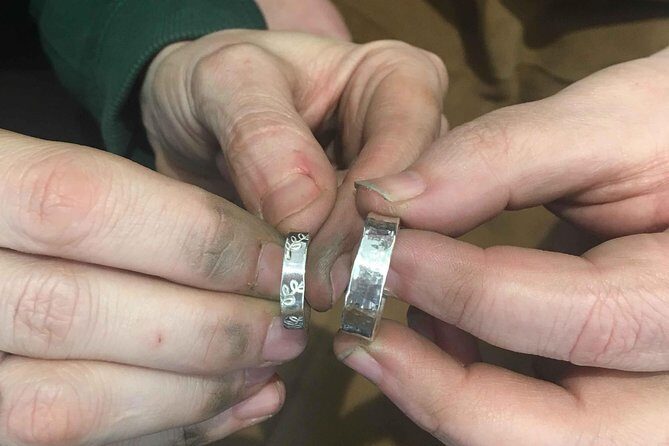
After your silver is cut, you’ll move into personalization: patterning, texturising, and/or stamping.
For a lot of people, this is the fun part. It’s also the part that makes your ring feel unique even before it’s forged into shape. Depending on what you choose, you might create subtle texture you can feel through your fingers, or a pattern that catches light differently than a plain band.
The best part is that you’re not just picking a decoration idea—you’re learning how metal takes marks. That teaches you what looks good in silver and what might become harder to define after soldering or polishing.
Annealing with a torch: why this stage exists
Before forging, the silver needs annealing. You’ll be taught what annealing is for, and then you’ll learn how to use the torch for it.
This step is important because silver isn’t automatically ready to be worked into shape. Annealing softens the metal so you can forge it without making it brittle or causing cracks. In other words, it’s not a random “fire step.” It’s the reason the later shaping works.
I like that the class explains why this happens. You’re not just following instructions—you’re understanding the logic of the craft.
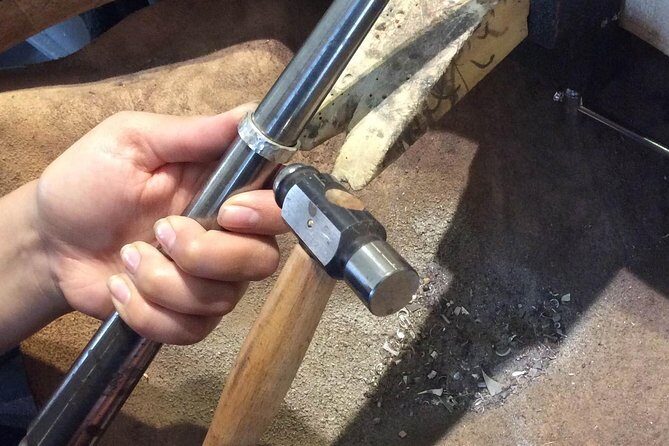
Forging, shaping, and sizing: turning flat metal into a band
Now the workshop shifts into form-making. You’ll forge your ring to shape and then saw it to size.
This is where the ring starts to look like a ring. You’ll see how hammering changes metal shape, and you’ll learn what to aim for before you move to joining. Because you’re doing it yourself, you’ll be able to spot how small adjustments affect the final fit.
It’s also a satisfying milestone: you go from a metal strip to an object with a clear future—something you can finish, clean up, and wear.
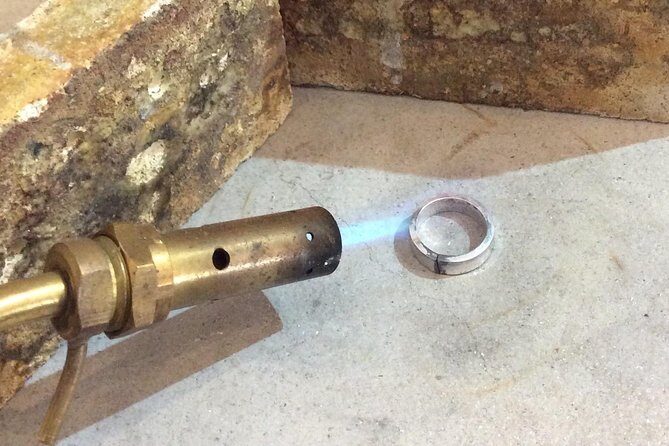
Soldering the join: torch work without the fear
Once the ring is formed and sized, it’s ready to be soldered. The silversmith explains the soldering process first, then you use the torch to join the ring.
If torch work sounds intimidating, it helps to know this is taught for beginners, with instruction and demonstration. The goal isn’t to teach you a lifetime of metalworking overnight. The goal is to help you do one clean soldered join as part of your ring-making sequence.
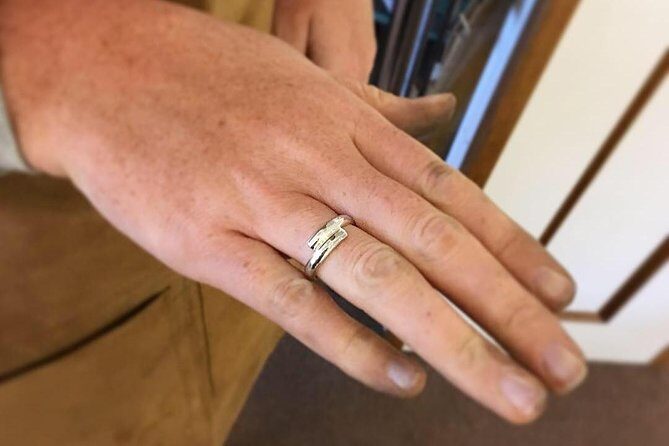
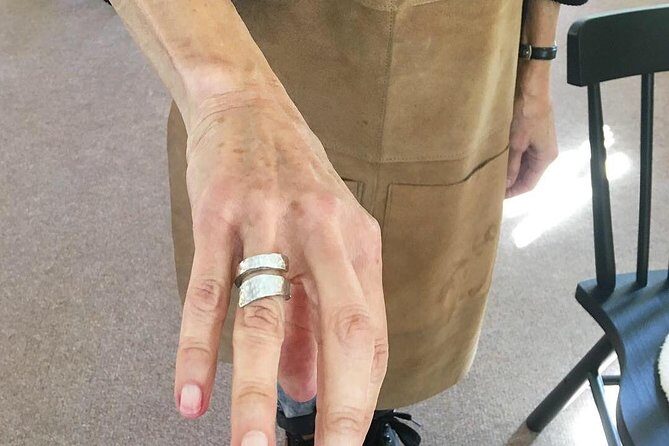
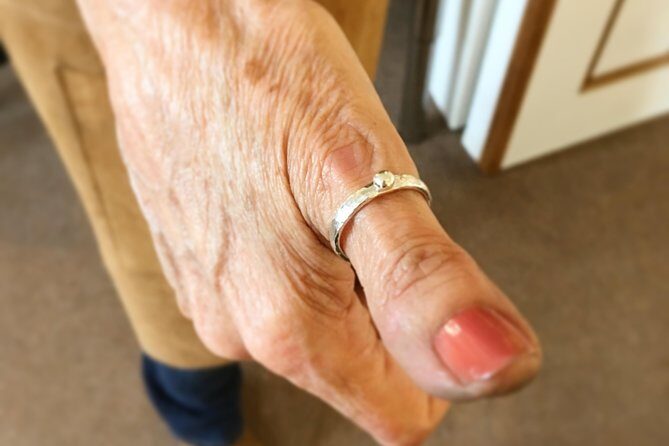
Filing, buffing scratches, and polishing: the part that sells the magic
After soldering, the ring still isn’t “store-ready.” You’ll use metal files to clean up the join, then buff any scratches and polish the entire ring.
This is the finishing stage where your labor becomes obvious. Small tool marks fade. Seams disappear. The surface turns from dull metal to shiny silver. In a couple of hours, you’ll watch your ring transform in front of you—not in an abstract way, but literally as light reflects differently across the metal.
One thing I’d call out: polishing isn’t just for appearance. It’s part of making the ring comfortable to wear, since roughness and edges are what you feel on your skin.
Coffee, tea, and studio vibe: small comforts that help you learn
The workshop includes coffee and/or tea and provides an apron. That’s not just hospitality fluff. When you’re working with tools and heat, a calm, comfortable setting makes it easier to focus and keep going through the whole sequence.
The workshop space is described as a delightful gallery in the heart of Canterbury, which matters because you’re not stuck in a back room or an industrial workshop. You’re making your ring in a place that feels like part art studio, part small craft shop.
Price and value: $131.95 plus the real silver-materials add-on
The listed price is $131.95 per person, and the workshop lasts about 3 hours (approx.). But there’s a key detail: materials are not included. You’ll pay an additional £10–£30 per ring at the end based on the finished weight.
How I think about the value:
- You’re not paying for a pre-made ring. You’re paying for guided labor plus tool access plus finishing time.
- The added materials cost is normal for this type of craft, because ring weight can vary by design and how thick the band ends up.
- The workshop teaches multiple techniques (not just one step), so you get a higher skill payoff than many single-activity classes.
If you’re trying to budget tightly, plan for the materials add-on. If you want the finished ring to come out looking and feeling right, those silver-materials costs are part of the equation.
Who should book this ring workshop in Canterbury?
This is best for you if:
- You want a hands-on craft experience rather than a passive tour
- You’re buying a gift or planning a memorable couple activity, like wedding bands or matching rings
- You enjoy learning why tools and techniques matter (annealing, soldering, filing, polishing)
It may not be the best choice if:
- You want a complex, advanced design (the class is beginner-friendly and keeps designs simple)
- You want zero add-on costs. Materials are paid at the end, and you’ll need to budget £10–£30 per ring.
Should you book Silver Ring Workshop in Canterbury?
Yes—if you like the idea of leaving with something you made yourself, and you don’t mind paying a materials add-on at the end. The experience is built around a full ring-making workflow, taught by Annie with patient, step-by-step guidance.
I’d book it especially if you’re in Canterbury for a short stay and want one activity that feels genuinely different. This isn’t just about owning a ring. It’s about learning the process that creates it—saw to solder to shine.
If you want a simple-to-wear design, enjoy tool time, and like the idea of turning raw silver into a wearable memory, this workshop is a very solid choice.
FAQ
How long is the silver ring workshop?
The session is about 3 hours (approx.). Sessions for one or two people typically last between 2–3 hours.
What is included in the price?
The included items are the guide and coffee and/or tea. You also get an apron during the workshop.
Are the silver materials included?
No. Materials are not included. There is an additional cost of about £10–£30 per ring, paid at the end depending on the finished weight.
What happens when I arrive?
You’ll join the studio at 10am, discuss basic designs, and get your finger measured. Then you’ll be given a drink and an apron before you start working at the bench.
Can beginners participate?
Yes. It’s a beginners workshop, and ring designs are kept simple (no signet rings).
What’s the workshop language?
The workshop is offered in English.
Where is the meeting point?
You meet at 76 Castle St, Canterbury CT1 2QD, UK. The activity ends back at the meeting point.
Is it private?
Yes. This is a private tour/activity, and only your group participates.
When does it run?
Workshops are scheduled Thursday–Saturday from 10:00 AM to 1:00 PM.